
Disclosure: This post contains affiliate links. If you buy through them, we may earn a commission at no extra cost to you. As an Amazon Associate I earn from qualifying purchases.
The first time I saw the quote “a cat falling from a second-floor window is a vet emergency, not a statistic,” I laughed. Then my friend’s cat actually slipped through a cracked window and spent three days at the emergency vet. Nobody laughs about it after that.
Cat-proofing isn’t about turning your home into a prison. It’s about fixing the handful of things that genuinely hurt cats, and doing it before they arrive. Here’s the practical guide — including the $60 DIY window net that took me an afternoon. Once the apartment is safe, follow our new cat checklist so nothing gets missed on day one.
Start with a Cat’s-Eye View
Before you buy anything, get on your hands and knees. Literally. Your cat will spend its life at floor level and window level, so that’s where the dangers are.
Walk the apartment and hunt for:
- Exposed electrical cords (they chew them — tuck and cover)
- Blind cords and curtain strings (strangulation risk, especially kittens)
- Small objects they can swallow: rubber bands, hair ties, earbuds
- Toxic plants: lilies are a hard no. Also check sago palm, aloe, pothos, and tulips before buying anything green
- Open toilets (kittens fall in)
- Medicines and cleaning supplies — they need to be behind closed doors
- Windows and balconies that open wide enough for a cat to squeeze through
Fix the cheap stuff first: cord covers, a drawer for hair ties, plants moved high or out. That’s 30 minutes and under $20.
The Window Problem: The One Thing You Can’t Skip
This is the part people ignore, and it’s the most important. A screen is not a cat barrier. Screens pop out, cats push through them, and “he never goes near the window” becomes a lie the day a bird lands outside.
**The rule: secure every openable window and every balcony, even on the second floor.**
Why the second floor? Cats survive two-story falls more often than people think, but the ones that don’t are the ones nobody gets to warn. Vets see it constantly: broken jaws, punctured lungs, internal bleeding. The “high-rise syndrome” stats are grim — cats have survived falls from seven stories, and also died from two./p>
Don’t gamble. Secure the windows.
The $60 DIY Window Net (My Favorite Fix)
You can hire someone to do this for $200-$1,000. Or you can do it yourself with about $60 of materials and an afternoon. Here’s exactly what I used:
- Two tension rods (top-to-bottom style, the kind that wedge between floor and ceiling)
- A roll of hexagonal mesh netting (buy 5 meters for a 3-meter window — you want extra)
- Nylon string or zip ties
**Step 1: Cut the netting.** For a 3-meter window, cut the mesh to about 3.3 meters, leaving 15cm extra on each side. Use plant scissors if regular scissors fight you — the mesh is tougher than it looks.
**Step 2: Set the tension rods.** One near the window frame, one a bit further out, so the net sits at a slight angle (cats can’t get a running jump and push through).
**Step 3: Tie the net to the rods.** Use nylon string or zip ties. Wrap zip ties around the net edges so no sharp wire pokes out — you don’t want scratches, and your cat doesn’t want snags.
**Step 4: Get a helper.** The mesh is stiff and wants to spring back. One person holds, one person ties. Do it in sections.
That’s it. I ran mine through a typhoon-strength storm and a few days of heavy rain, and it held perfectly. It’s been a year and I’ve never worried about the window since.
Balconies: Same Rules, Bigger Job

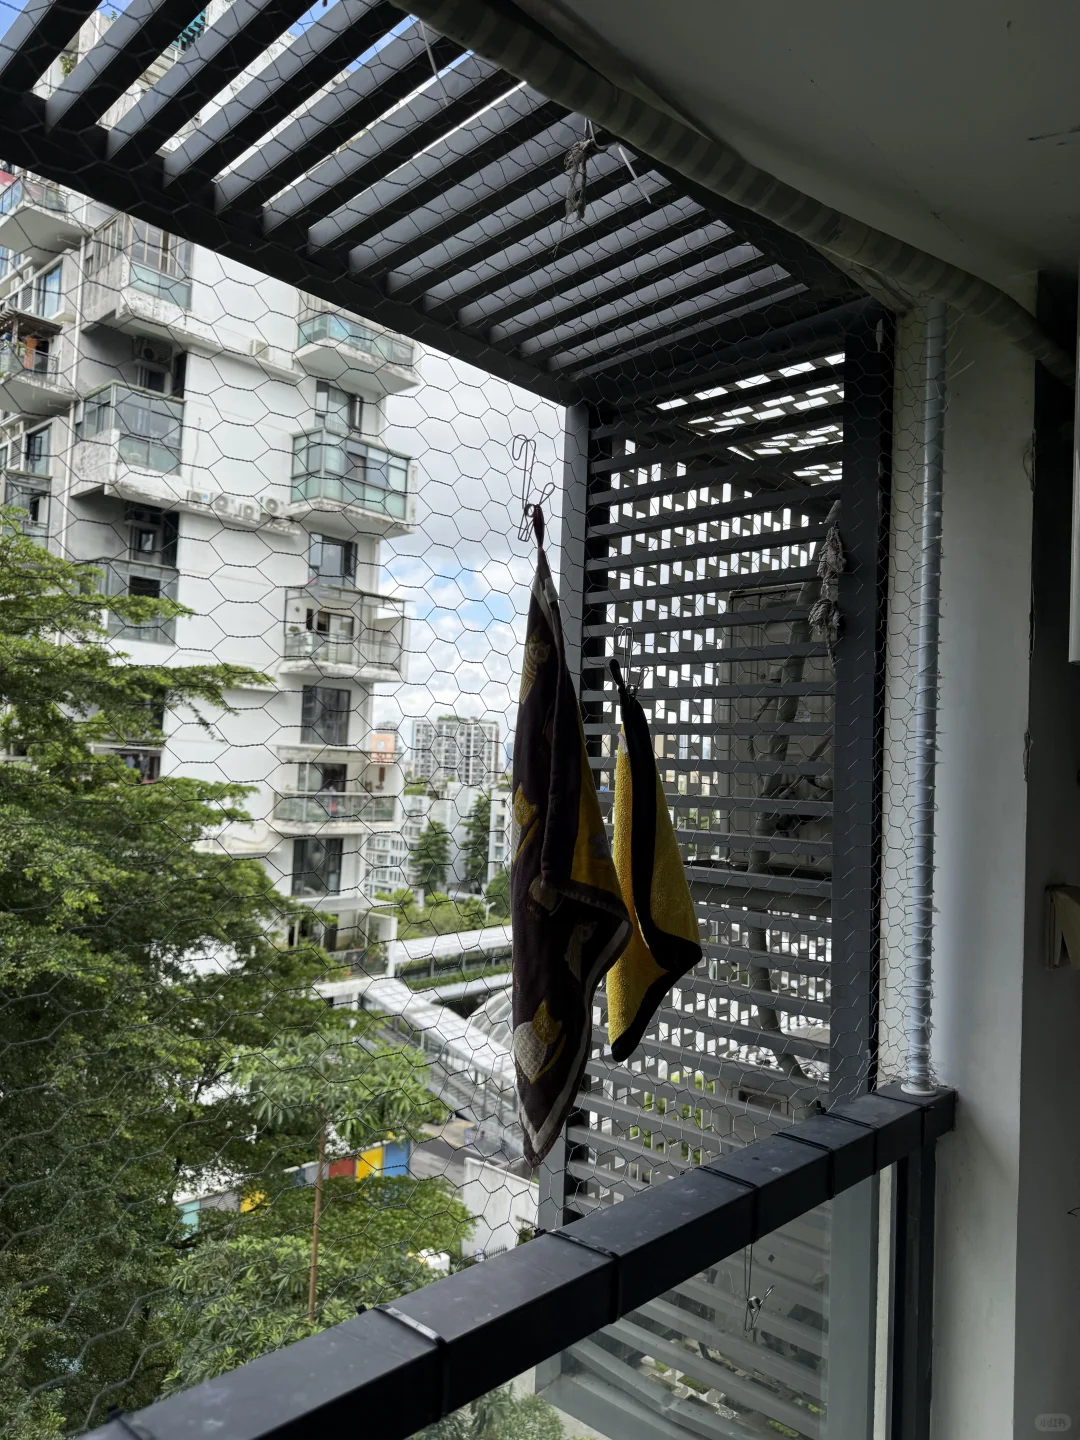
Balconies need the same treatment, just scaled up. A 5-meter balcony with a 2-meter height costs about $100-$150 in materials (tension rods + mesh) versus $800-$1,000 for a professional install. The DIY job takes about a day.
Same technique: tension rods, mesh, zip ties, wrap the edges. Test every corner for gaps — a cat will find the one spot you missed. Use the “is there a gap a cat head fits through” test, because if a head fits, the rest follows.
Indoor Stuff That Actually Needs Fixing
Windows and balconies are the life-or-death part. The rest of cat-proofing is about your stuff surviving the cat.
Scratching
If you don’t give your cat somewhere to scratch, your sofa volunteers. Put a tall, sturdy post near their favorite nap spot and reward them for using it. Cardboard scratchers are cheap and cats love them. My [mistakes post](https://pawsavvyguide.com/10-mistakes-first-time-cat-owners-make/) covers the full “why is my cat ruining my couch” saga. And if the scratching is stress-driven — after a move or a new pet — a pheromone diffuser like **Feliway Classic** can calm things down faster than any deterrent spray — Feliway Classic.
Cabinets and counters
Kittens open lower cabinets, especially with child-proof latches that defeat many cats. Actually, child latches defeat most adult humans too, so they’re not a bad start. Counter surfing is a training issue — make counters unrewarding and provide a high perch nearby.
Plants
Check every plant before it enters the house. Lilies are the big one — even pollen is toxic to cats. Keep plants either fully out of reach or confirmed non-toxic. If you’re not sure, the ASPCA’s toxic plant list is the reference.
Small spaces
Cats squeeze into everything: the space behend the washer, under the couch, inside dresser drawers. Check before you close doors, start the dryer, or move heavy furniture. This one’s free — it’s just a habit. And if your cat stays extra tense through all the changes — loud neighbors, construction, a recent move — a calming wrap like the **ThunderShirt** or a chew like **Zesty Paws Calming Bites** can take the edge off without medication — ThunderShirt and Zesty Paws Calming Bites.
What NOT to Do
- **Don’t use chicken wire indoors** where cats can snag a paw. Use mesh or netting made for pet window guards.
- **Don’t rely on a single screen** as your only barrier.
- **Don’t “test” whether your cat will fall** — they will, eventually, and the test is expensive.
- **Don’t leave balcony doors aja�** even “just for a minute.” That’s all it takes.
FAQ
**Do I need to cat-proof if I live on the first floor?**
Yes — first-floor cats still escape, fight, get hit by cars, or eat toxic plants outside. The stakes are lower, but the outside world is still dangerous.
**What about apartment cats who never go near windows?**
Every cat owner says this until a bird lands on the sill. Curiosity wins eventually. Secure the window.
**Is mesh netting ugly?**
Less ugly than the alternative, and you can get clear or dark mesh that blends with the frame. Most guests don’t even notice mine.
**Can I just keep the windows closed all the time?**
You can, but cats love the sun and fresh air, and a closed-up apartment is miserable in summer. A secure window gives them the view without the risk.
**How much does professional cat-proofing cost?**
$200-$1,000 depending on the job. The DIY route is $60-$150 in materials and a day of work. Both are worth it; the important thing is that it gets done.
Final Thought
Cat-proofing is 80% common sense and 20% actually doing the window net. Do the floor-level sweep, secure every window and balcony, check your plants, and build a decent scratching setup.
It’s one afternoon of work for years of not being that person at the emergency vet. Worth it.
Prices and availability are accurate as of the publication date and may change. Please check the product page for current pricing.
Reminder: This post contains affiliate links. See our full disclosure here.
Love cats? Get more tips like this
Join our newsletter for practical cat care guides, honest product roundups, and new posts delivered straight to your inbox. No spam — unsubscribe anytime.
3 thoughts on “How to Cat-Proof Your Apartment (Without Spending a Fortune)”